스프링부트에서 의존성을 추가하고 싶을 때 주로 스프링부트에서 제공하는 starter 라이브러리를 의존성 설정파일에 추가한다.
예를들어 Mybatis 라이브러리를 추가하고자 하면 제공되는 starter 라이브러리를 의존성설정파일(메이븐의 경우 pom.xml)에 아래처럼 추가한다. starter 라이브러리는 단순히 의존성만 추가되는 것이 아니라 자동설정을 포함 하는데, 이것에 대해 자세히 알아본다.

<dependency>
	<groupId>org.mybatis.spring.boot</groupId>
	<artifactId>mybatis-spring-boot-starter</artifactId>
	<version>2.1.1</version>
</dependency>

mybatis starter 라이브러리를 기준으로 포스팅할 예정이며 다른 라이브러리도 비슷하다.


mybatis-spring-boot-starter

스프링부트 프로젝트의 pom.xml에 추가한 mybatis-spring-boot-starter 자체에는 많은 파일이 있지는 않다.
META-INF 폴더에 pom.xml과 pom.properties 파일만 있는 정도이다.
아래는 mybatis-spring-boot-starter의 파일구성과 pom.xml이다. starter의 pom.xml에는 사용될 다른 라이브러리와 autoconfigure(mybatis-spring-boot-autoconfigure) 라이브러리가 포함되어 있는 것을 볼 수 있다.

mybatis-spring-boot-starter

<project xmlns="http://maven.apache.org/POM/4.0.0" xmlns:xsi="http://www.w3.org/2001/XMLSchema-instance" 
         xsi:schemaLocation="http://maven.apache.org/POM/4.0.0 http://maven.apache.org/xsd/maven-4.0.0.xsd">
  <modelVersion>4.0.0</modelVersion>
  <parent>
    <groupId>org.mybatis.spring.boot</groupId>
    <artifactId>mybatis-spring-boot</artifactId>
    <version>2.1.1</version>
  </parent>
  <artifactId>mybatis-spring-boot-starter</artifactId>
  <name>mybatis-spring-boot-starter</name>
  <properties>
    <module.name>org.mybatis.spring.boot.starter</module.name>
  </properties>
  <dependencies>
    <dependency>
      <groupId>org.springframework.boot</groupId>
      <artifactId>spring-boot-starter</artifactId>
    </dependency>
    <dependency>
      <groupId>org.springframework.boot</groupId>
      <artifactId>spring-boot-starter-jdbc</artifactId>
    </dependency>
    <dependency>
      <groupId>org.mybatis.spring.boot</groupId>
      <artifactId>mybatis-spring-boot-autoconfigure</artifactId>
    </dependency>
    <dependency>
      <groupId>org.mybatis</groupId>
      <artifactId>mybatis</artifactId>
    </dependency>
    <dependency>
      <groupId>org.mybatis</groupId>
      <artifactId>mybatis-spring</artifactId>
    </dependency>
  </dependencies>
</project>

mybatis-spring-boot-autoconfigure

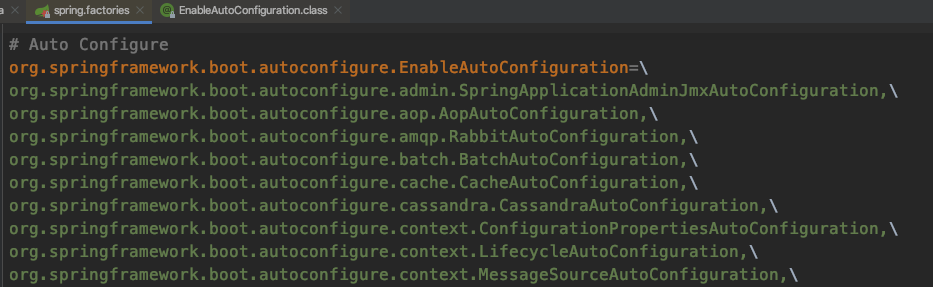
pom.xml 중간에 추가된 autoconfigure는 자동설정 클래스를 포함하고 있다.(spring.factories  XxxAutoConfiguration.class 포함)

스프링부트 프로젝트 기동시 메인 클래스의 @EnableAutoConfiguration 애노테이션이 spring.factories 파일을 읽어들여 자동설정을 진행하는데 자세한 내용은 이전 포스팅을 참고하자.

이전 포스팅 링크 :

2020/12/01 - [Dev/스프링부트] - @SpringBootApplication에 대해서(Springboot 기본구조)


@SpringBootApplication에 대해서(Springboot 기본구조)

스프링부트 기본 프로젝트를 생성하면 main메서드를 포함하는 시작 클래스가 있고, 이 클래스에는 @SpringBootApplication이 마킹되어 있다. @SpringBootApplication는 다수의 애노테이션으로 이루어진 메타

yangbox.tistory.com

mybatis-spring-boot-autoconfigure

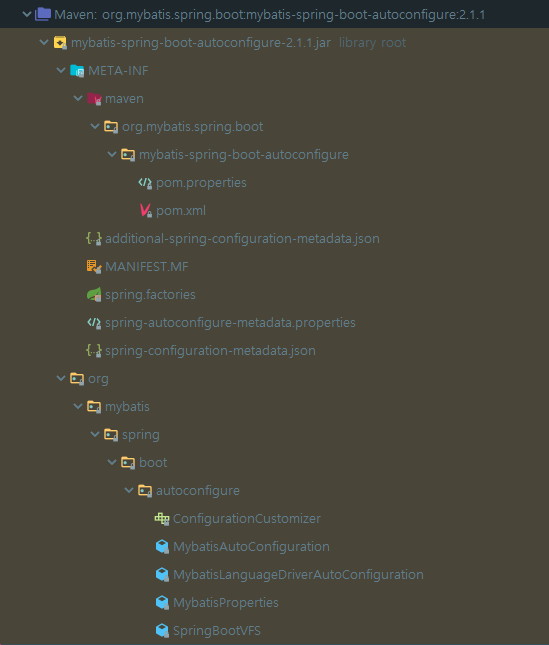
mybatis-spring-boot-autoconfigure의 내용(위 사진)을 보면 MybatisAutoConfiguration 자동설정클래스도 보이고, MybatisProperties 프로퍼티 클래스도 보인다. 이 중 프로퍼티 클래스에 대해 좀 더 살펴보면 보통 어플리케이션에 프로퍼티 설정을 위해 application.yml, application.properties와 같은 파일을 두고 키-값으로 프로퍼티를 작성한다. 이 값들을 스프링부트가 읽어 들여 변수에 세팅하는 클래스가 MybatisProperties 같은 프로퍼티 클래스이다.

좀 더 자세히 보자. MybatisProperties의 소스코드 일부이다. @ConfigurationProperties는 외부 프로퍼티를 사용하는 클래스라는 의미이고 prefix값을 지정할 수 있다. 예를들어 application.properties에서 'mybatis'로 시작하는 프로퍼티를 작성하면 읽어 들여 클래스의 변수에 바인딩된다.
mybatis.configLocation 프로퍼티 작성 -> MybatisProperties 클래스의 configLocation 변수에 바인딩

  @ConfigurationProperties(prefix = MybatisProperties.MYBATIS_PREFIX)
  public class MybatisProperties {
    public static final String MYBATIS_PREFIX = "mybatis";
    private String configLocation; // 프로퍼티 설정파일에서 값을 읽어들여 바인딩된다.
    // 생략
  }

변수가 바인딩된 프로퍼티 클래스를 AutoConfiguration 자동설정 클래스에서 @EnableConfigurationProperties(MybatisProperties.class) 애노테이션을 마킹하여 바인딩된 변수(프로퍼티 설정파일의 값)를 이용하여 자동설정 한다.

  @org.springframework.context.annotation.Configuration
  @ConditionalOnClass({ SqlSessionFactory.class, SqlSessionFactoryBean.class })
  @ConditionalOnSingleCandidate(DataSource.class)
  @EnableConfigurationProperties(MybatisProperties.class)
  @AutoConfigureAfter({ DataSourceAutoConfiguration.class, MybatisLanguageDriverAutoConfiguration.class })
  public class MybatisAutoConfiguration implements InitializingBean {
      private static final Logger logger = LoggerFactory.getLogger(MybatisAutoConfiguration.class);
      private final MybatisProperties properties; // 바인딩된 properties
      // 생략
  }

요약

스프링부트에서 의존성을 추가하고 싶다면 제공되는 stater가 있는지 알아본다.
starter는 단순히 라이브러리를 추가하는 것에 더해서 autoconfigure 라이브러리를 참조한다.
autoconfigure의 spring.factories에 정의된 자동설정 클래스들이 실행되고 스트링부트 프로젝트의 application.properties 같은 프로퍼티 설정파일에서 값을 읽어 들여 자동설정에 사용한다.


스프링부트 기본 프로젝트를 생성하면 main메서드를 포함하는 시작 클래스가 있고, 이 클래스에는 @SpringBootApplication이 마킹되어 있다.

@SpringBootApplication는 다수의 애노테이션으로 이루어진 메타애노테이션으로 상세 애노테이션들이 실행되어 빈 등록 및 자동설정을 수행한다. 주요 기능을 수행하는 상세 애노테이션은 3가지다.


@SpringBootApplication = @SpringBootConfiguration + @EnableAutoConfiguration + @ComponentScan


아래는 @SpringbootApplication의 코드 일부로 구성하는 3개의 애노테이션을 확인할 수 있다. @SpringbootApplication은 이 3가지 애노테이션을 동작시켜 스프링부트 기동시 기반작업(빈등록 등)을 수행하게 하는 역할이다.

@SpringBootConfiguration
@EnableAutoConfiguration
@ComponentScan(excludeFilters = { @Filter(type = FilterType.CUSTOM, classes = TypeExcludeFilter.class),
	@Filter(type = FilterType.CUSTOM, classes = AutoConfigurationExcludeFilter.class) })
public @interface SpringBootApplication {
	...
}

@SpringBootConfiguration은 그저 자바 설정파일임을 마킹하는 애노테이션이고 아래 두개의 애노테이션이 스프링 Bean등록의 핵심이 된다. Bean 등록은 두 단계로 나뉘어져 진행되는데 다음과 같다.


1단계 @ComponentScan : 개발자가 지정한(애노테이션으로 마킹한) 클래스를 빈으로 등록

2단계 @EnableAutoConfiguration : 기타 라이브러리의 클래스를 자동으로 빈 등록


하나씩 살펴본다.

@ComponentScan

해당 애노테이션이 마킹된 자바파일의 패키지를 기본패키지로 하위 패키지의 컴포넌트들을 모두 빈으로 등록한다. 빈 등록 대상은 개발자가 애노테이션을 마킹한 클래스들이고, 이 때 마킹에 사용되는 주요 애노테이션은 아래와 같다.

클래스의 성격에 따라 맞는 애노테이션을 마킹한다.


- @Component

- @Configuration, @Repository, @Service, @Controller, @RestController 등


@EnableAutoConfiguration

@EnableAutoConfiguration은 @ComponentScan이 동작한 이후 자동설정이 동작한다. 이름에서 알 수 있듯이 라이브러리에 추가한 클래스들을 빈으로 자동등록 및 추가 자동설정을 해준다.

spring-boot-starter 안에는 자동설정을 위해 spring-boot-autoconfigure 라이브러리가 포함되어 있다. @EnableAutoConfiguration도 여기 라이브러리에 포함되어 있고, 다른 주요파일로는 META-INF/spring.factories 파일이 있다.

META-INF 디렉터리에 대해서는 이전에 정리한 글을 참고한다.

2018/04/12 - [Dev/기타] - META-INF 디렉터리에 대하여

spirng-boot-autoconfgure 라이브러리 및 spring.factories 파일의 일부

spring.factories을 열어보면 여러 클래스들이 나열되어 있는데, 그 중 org.springframework.boot.autoconfigure.EnableAutoConfiguration 프로퍼티값으로 작성된 AutoConfiguration 클래스들이 모두 자동설정의 대상이 된다. 살펴보면 tomcat 자동설정, DispatcherServlet 자동설정 등 많은 수의 자동설정을 기본으로 제공하는 걸 볼 수 있다.

spring.factories에 작성된 자동설정 대상이 되는 클래스들은 모두 @Cofiguration이 마킹되어 있다. 당연히 스프링부트 기동시 설정파일로 읽어들여 실행된다.

일반적으로 스프링부트 환경에서 A 라이브러리를 추가한다고하면, A라이브러리의 자동설정파일이 spring.factories에 정의되어 있고, 이 자동설정파일을 스프링부트가 기동시 실행하여 빈등록이나 추가 초기화 작업을 수행하게 된다. 라이브러리만 추가했을 뿐인데 빈등록이 되었다면 이 과정이 수행되었을 가능성이 크다.

org.springframework.boot.autoconfigure.EnableAutoConfiguration 프로퍼티값이 선언되어 있는 자동설정

AutoConfiguration 클래스에는 @ConditionalOnXxxYyyZzz 과 비슷한 유형의 애노테이션들이 작성되어 있다. 이는 모든 클래스들이 다 적용되는 것이 아니라 자동설정 클래스별로 조건에 따라 자동설정 되거나 무시된다. 예를들어 @ConditionalOnMissingBean 조건에는 특정 빈이 등록되어 있지 않은 경우에만 해당 설정파일이 적용된다.


정리하면 스프링부트의 시작점인 메인 클래스에는 @SpringBootApplication라는 메타 애노테이션이 마킹되어 있다.

이 애노테이션을 통해 개발자가 작성한 클래스들이 자동으로 읽어져 빈으로 등록되고,(@ComponentScan의 기능)

의존성에 추가한 라이브러리의 자동 설정 및 빈등록도 진행된다.(@EnableAutoConfiguration의 기능)

Thread를 구현할 때 Runnable 인터페이스를 구현하거나 Thread 클래스를 상속하여 구현한다. 구현한 Thread를 new MyThread().start() 와 같이 호출하여 직접적으로 실행할 수도 있지만 기본 JDK의 java.util.concurrent패키지의 ExcecutorService를 이용하여 실행할 수도 있다.


ExecutorService

ExecutorService는 재사용이 가능한 ThreadPool로 Executor 인터페이스를 확장하여 Thread의 라이프사이클을 제어한다.
Thread를 활용하여 다수의 작업(Task)들을 비동기로 수행한다는 것은 간단하지 않다. Thread의 라이프사이클(생성과 제거 등)이나 발생할 수 있는 여러가지 low level의 고려사항들이 존재하는데 이를 개발자가 신경쓰지 않도록 편리하게 추상화한 것이 ExecutorService이다.

ExecutorService에 Task(작업)를 지정해주면 가진 ThreadPool을 이용하여 Task를 실행한다. Task는 큐(Queue)로 관리되기 때문에 ThreadPool의 Thread 갯수보다 실행할 Task가 많은경우 미실행된 Task는 큐에 저장되어 실행을 마친 Thread가 생길 때까지 기다린다.


ExecutorService 초기화

ExecutorService를 초기화 하는 방법에는 2 가지 방법이 있다.

1. 직접 new 키워드를 사용

ExecutorService는 인터페이스이기 때문에 구현체인 ThreadPoolExecutor를 new키워드로 초기화한다. (필요에 따라 다른 구현체를 초기화해도 된다.)

아래의 초기화 코드에서 10개의 core thread, 10개의 max thread, 0 밀리세크의 keepAliveTime, 작업 큐로는 LinkedBlockingQueue가 초기화되었다. Task(작업)을 위한 Queue에는 Runnable과 Callable 인터페이스를 구현한 클래스를 받을 수 있는데 return값이 있냐(Callable) 없냐(Runnable)에 따라 선택하면 된다.

ExecutorService executorService = new ThreadPoolExecutor(10, 10, 0L, TimeUnit.MILLISECONDS, new LinkedBlockingQueue());

2. Executors 클래스에서 제공하는 Factory method를 사용

제공되는 3가지의 factory method를 이용한 초기화이다. 메서드명에서 생성되는 ThreadPool의 성향을 유추할 수 있으며 실행하고자 하는 Task에 따라 선택하여 사용한다.

// 1. 10개 고정 사이즈의 ThreadPool 생성
ExecutorService executorService = Executors.newFixedThreadPool(10);

// 2. 1개 고정 사이즈의 ThreadPool 생성
ExecutorService executorService = Executors.newSingleThreadExecutor();

// 3. 유동적으로 증가하고 줄어드는 ThreadPool 생성
ExecutorService executorService = Executors.newCachedThreadPool();

new 키워드를 사용하는 것이 좀 더 세부적인 설정이 가능하지만 Executors를 사용하는 것이 더 간편하다. 대부분의 경우 간편한 설정으로 원하는 작업이 가능하다.


ExecutorService Task 할당

ExecutorService를 초기화 했다면 ThreadPool에 원하는 Task(작업)을 할당해야 한다. 일단 Task를 Callable / Runnable 인터페이스를 구현하여 생성하고, ExecutorService의 메서드를 호출하여 실행한다.

// Runnable 인터페이스로 Task 정의
Runnable runnableTask = () -> {
	try{
		System.out.println(Thread.currentThread().getName() + " start");
		TimeUnit.MILLISECONDS.sleep(500);
		System.out.println(Thread.currentThread().getName() + " end");
	} catch (InterruptedException e) {
		e.printStackTrace();
	}
};

// Callable 인터페이스로 Task 정의
Callable callableTask = () -> {
	TimeUnit.MILLISECONDS.sleep(5000);
	return "Task's execution";
};

// 정의한 Task를 List에 추가
List<Callable> callableTasks = new ArrayList<>();
callableTasks.add(callableTask);


아래는 위에서 정의한 작업(Task)을 할당(실행)하기 위해서 제공되는 메서드들이다.


1. execute() : 리턴타입이 void로 Task의 실행결과나 Task의 상태(실행중 or 실행완료)를 알 수 없다.

executorService.execute(runnableTask);


2. submit() : Task를 할당하고 Future 타입의 결과값을 받는다. 결과가 리턴되어야 하므로 주로 Callable을 구현한 Task를 인자로 준다.

Future future = executorService.submit(callableTask);


3. invokeAny() : Task를 Collection에 넣어서 인자로 넘겨줄 수 있다. 실행에 성공한 Task 중 하나의 리턴값을 반환한다.

String result = executorService.invokeAny(callableTasks);


4. invokeAll() : Task를 Collection에 넣어서 인자로 넘겨줄 수 있다. 모든 Task의 리턴값을 List<Future<>> 타입으로 반환한다.

List<Future> futures = executorService.invokeAll(callableTasks);

ExcecutorService 종료

실행 명령한 Task가 모두 수행되어도 ExecutorService는 자동으로 종료되지 않는다. 앞으로 들어올 Task를 처리하기 위해 Thread는 wait 상태로 대기한다. 그러므로 종료를 위해서는 제공되는 shutdown() 이나 shutdownNow() API를 사용해야 한다.


1. executorService.shutdown()

실행중인 모든 Task가 수행되면 종료한다.


2. List<Runnable> notExecutedTasks = executorService.shutDownNow()

실행중인 Thread들을 즉시 종료시키려고 하지만 모든 Thread가 동시에 종료되는 것을 보장하지는 않고 실행되지 않은 Task를 반환한다.

여기에 추가로 두 개의 shutdown 메서드가 결합된 awaitTermination()을 사용하는 것이 추천된다. 이 메서드는 먼저 새로운 Task가 실행되는 것을 막고, 일정 시간동안 실행중인 Task가 완료되기를 기다린다. 만일 일정 시간동안 처리되지 않은 Task에 대해서는 강제로 종료시킨다.

executorService.shutdown();
try {
	if (!executorService.awaitTermination(800, TimeUnit.MILLISECONDS)) {
		executorService.shutdownNow();
	} 
} catch (InterruptedException e) {
	executorService.shutdownNow();
}

Future 인터페이스

submit()invokeAll() 메서드를 호출할때 반환하는 Future 객체로 Task의 결과값이나 상태(실행중 또는 실행완료)를 알 수 있다. 또한 Future 인터페이스는 Blocking method인 get()을 제공하는데 Task 실행 결과를 얻을 수 있다.(Runnable을 구현한 Task라면 null이 반환된다.)

Blocking이기 때문에 실행중에 get()이 호출되는 경우 실행이 끝날 때까지 대기한다. 이는 성능저하를 불러올 수 있으므로 Timeout을 설정하여 일정 시간이 지나면 TimeoutException이 발생하도록 유도할 수 있다.

Future<String> future = executorService.submit(callableTask);
String result = null;
try {
    result = future.get(); // Task가 실행중이면 여기서 대기한다.
} catch (InterruptedException | ExecutionException e) {
    e.printStackTrace();
}

// Timeout 설정, 지정된 시간이 지나면 TimeoutException이 발생한다.
String result = future.get(200, TimeUnit.MILLISECONDS); 

이 밖에도 isDone(), cancel(), isCancelled() 메서드가 있다.

boolean isDone = future.isDone(); // Task가 실행되었는지?
boolean canceled = future.cancel(true); // Task를 취소
boolean isCancelled = future.isCancelled(); // Task가 취소되었는지?

'개발 > JAVA' 카테고리의 다른 글

equals, hashcode  (0) 2020.12.07
JVM, JRE, JDK 간단 개념  (0) 2020.12.07
Comparator, Comparable 어떻게 사용할까?  (0) 2020.11.29
LocalDateTime, ZonedDateTime  (0) 2019.10.11
Collections를 이용한 정렬(sort method) 활용  (0) 2017.05.09

+ Recent posts