3.1 Validation by Using Spring's Validator Interface
스프링은 객체에 대한 검증을 위해 추상화한 Validator 인터페이스를 제공한다. org.springframework.validation.Validator 인터페이스는 다음 두 가지 메서드를 가진다.
supports(Class): Validator가 해당 Class를 처리할 수 있는지 boolean을 반환한다.
validate(Object, org.springframework.validation.Errors): Object에 대한 검증을 실시하며 결과를 Errors 객체에 담는다.
가장 Low-Level의 객체에 대한 Validator 사용법은 아래를 참고한다. 검증을 위한 helper 클래스로써 ValidationUtils을 사용한다. ValidationUtils에 대한 자세한 사용법은 문서를 참고하며 간단한 검증 및 결과를 Errors객체에 담는 용도로 사용한다.
// 검증대상 클래스
public class Person {
    private String name;
    private int age;
    // the usual getters and setters...
}
// Validator를 구현하는 클래스
public class PersonValidator implements Validator {
    /**
     * This Validator validates *only* Person instances
     */
    public boolean supports(Class clazz) {
        return Person.class.equals(clazz);
    }

    public void validate(Object obj, Errors e) {
        ValidationUtils.rejectIfEmpty(e, "name", "name.empty");
        Person p = (Person) obj;
        if (p.getAge() < 0) {
            e.rejectValue("age", "negativevalue");
        } else if (p.getAge() > 110) {
            e.rejectValue("age", "too.darn.old");
        }
    }
}
// 검증 code snippet
TestPerson maruta = new TestPerson("검증대상", 200); // 검증 오류 대상
Errors errors = new BeanPropertyBindingResult(maruta, "testperson"); // Errors 객체 초기화
validator.validate(maruta, errors); // 검증 실행
if(errors.hasErrors()){ // 검증 오류가 있으면
    for(ObjectError error : errors.getAllErrors()){
        System.out.println("error : " + Arrays.toString(error.getCodes()));
    }
}
위의 예시처럼 커스텀 Validator를 만들어서 사용해도 되지만, 공통적으로 사용할 수 있는 검증을 모아서 제공되는 Validator가 있다. 예를들면 문자열의 길이 체크나, 숫자의 최대값/최소값 체크같은 기본적인 검증을 할 대상 클래스의 인스턴스 변수에 애노테이션(@MIN, @MAX, @SIZE 등)으로 마킹한 후 스프링부트 2.0.5 이상에서 자동등록되는 LocalValidatorFactoryBean에 의해 검증하는 것이다.
이는 MessageCodesResolver(DefaultMessageCodesResolver)가 객체명이나 프로퍼티명, 타입을 이용해 추가해준 것이며, 에러메세지 출력의 편의성을 위해서 동작한다. 개발자가 설정한 에러코드와 자동으로 추가된 에러코드가 프로퍼티 소스로부터 메세지를 가져오기 위해 사용된다.
3.3 Bean Manipulation and the BeanWrapper
BeanWrapper org.springframework.beans 패키지는 JavaBean 표준에 부합(adhere)하다. JavaBean은 인자가 없는 생성자와 naming convention을 따르는 클래스를 말한다. org.springframework.beans 패키지에서 가장 중요한 인터페이스 중 하나는 BeanWrapper이다. 이 인터페이스는 직접적으로 어플리케이션 코드에서 호출되지는 않지만 DataBinder와 BeanFactory가 빈에 프로퍼티를 설정할 때 사용된다.
PropertyEditor 어플리케이션에서 대부분의 값을 문자열로 표현한다. 예를 들어, 빈 메타 설정에 대한 XML파일을 작성할 때 int 타입이나 빈의 타입 등을 모두 문자열로 표현한다. 이러한 문자열을 적절한 타입(Object)으로 변경하는 것이 PropertyEditor이다. PropertyEditor는 java.beans 패키지에 포함되어 오래전부터 존재했다. 스프링에서는 여러 종류의 PropertyEditor의 구현체를 제공한다. org.springframework.beans.propertyeditors 패키지 이하에 위치하며, 대부분은 BeanWrapper의 구현체인 BeanWrapperImpl에 등록되어 사용된다. 자세한 리스트는 링크를 참고한다. 커스터마이징한 PropertyEditor를 구현하여 사용할 수도 있지만 Thread-Safe하지 않으므로 싱글톤 빈으로 등록해서 사용하는 것은 지양해야 한다.(Scope를 Thread로 지정하여 사용하는 것도 가능하다.)
Custom PropertyEditor구현 - ExoticType 클래스에 String 값을 바인딩한다.
public class ExoticTypeEditor extends PropertyEditorSupport {
    public void setAsText(String text) {
        setValue(new ExoticType(text.toUpperCase()));
    }
}
Controller에서 @InitBinder 메서드에 PropertyEditor를 등록하여 사용할 수 있다.
@InitBinder
public void initBinder(WebDataBinder webDataBinder){
		webDataBinder.registerCustomEditor(ExoticType.class, new ExoticTypeEditor());
}
정리하면, 스프링은 문자열 값에서 객체로의 타입변경을 위해서 jdk에 존재하는 PropertyEditor를 구현한 클래스들을 제공하고 있다. 하지만, 스프링 3 이후 소개된 Converter와 Formatter가 PropertyEditor의 단점을 보완하여 사용되고 있다.
3.4 Spring Type Conversion
스프링 3부터 소개된 core.convert 패키지는 타입변환 시스템을 지원한다. 이는 이전까지 사용되던 PropertyEditor의 단점을 보완하면서 대체할 수 있다.
PropertyEditor의 단점 : Stateful 하기 때문에 Thread-Safe 하지 않다. String - Object 사이의 변환만 지원한다.
Converter SPI 한 객체를 다른 타입의 객체로 변환하기 위해 스프링에서 제공하는 인터페이스이다. Converter 생성을 위해서는 Converter<S, T> 인터페이스를 구현한다. S 타입의 객체를 인자로 입력받아서 T 타입으로 변환하여 반환하는 메서드 1개만 존재한다. PropertyEditor와 다르게 인자나 반환형에 대한 제한이 없고, Thread-Safe하다.(싱글톤 사용이 가능하다.)
package org.springframework.core.convert.converter;

public interface Converter<S, T> {
    T convert(S source);
}
간단한 Converter들은 스프링이 이미 구현하여 제공하고 있다.
package org.springframework.core.convert.support;

final class StringToInteger implements Converter<String, Integer> {
    public Integer convert(String source) {
        return Integer.valueOf(source);
    }
}
경우에 따라 Converter 인터페이스에서 추가적인 설정이 가능한 인터페이스를 사용할 수 있다. 예를 들면, String 타입에서 Enum 타입의 객체로 변환하는 것처럼 클래스 체계에 대한 변환로직이 필요한 경우 ConverterFactory 인터페이스를 사용할 수 있고, 좀 더 유연한 변환을 원한다면 GenericConverter를 사용을 고려할 수 있다.
ConversionService API ConversionService는 런타임시에 타입변환 로직을 수행할 통합 API를 정의한다.
실제 타입변환은 등록된 Converter들에 의해 수행되며, 대부분의 ConversionService 구현체들은 Converter의 등록을 위해 ConverterRegistry 인터페이스를 구현하고있다. 즉, 용도에 맞춰 수동으로 컨버터를 선택하여 실행하지 않고 ConversionService 하나만 호출하여 변환한다.
ConversionService는 stateless하므로 초기화 된 후 Multi-Thread에서 공유가 가능하다. (PropertyEditor의 단점을 보완)
디폴트 ConversionService를 사용하기 위해서는 빈으로 등록하여 사용하고, 만일 추가적으로 커스터마이징한 컨버터를 등록하고 싶다면 property에 추가하여 사용한다. 타입 변환을 위해 자동으로 사용되지만 소스코드에서 주입받아 사용도 가능하다.
Formatter SPI Converter와 같이 타입변환을 위해 제공되는 인터페이스이다. 차이점은 문자열 타입변환만 제공한다는 점이다. Formatter는 Printer와 Parser 두 개의 인터페이스를 상속받고 있다. Printer와 Parser의 메서드는 인자로 Locale을 받아 국제화를 지원할 수 있다. 메서드의 인자에서 알 수 있듯이 String 문자열을 Locale 정보에 맞게 객체화 시키거나 객체를 Locale 정보에 맞게 String 문자열로 변환하는 기능을 한다.
package org.springframework.format;

public interface Formatter<T> extends Printer<T>, Parser<T> {
}
public interface Printer<T> {
    String print(T fieldValue, Locale locale);
}
import java.text.ParseException;

public interface Parser<T> {
    T parse(String clientValue, Locale locale) throws ParseException;
}
주로 사용되는 용도는 org.springframework.format.number 패키지의 NumberStyleFormatter, CurrencyStyleFormatter 같이 숫자와 관련된 포맷팅이나 org.springframework.format.dateTime 패키지의 DateFormatter 같이 날짜시간에 관련된 포맷팅에 사용된다.
Formatter는 애노테이션에 바인딩되어 편리하게 사용할 수 있다.(Annotation-driven Fomatting) 바인딩하고자 하는 애노테이션으로 AnnotationFormattingFactory를 구현하고, 클래스의 프로퍼티에 애노테이션을 마킹하면 된다.
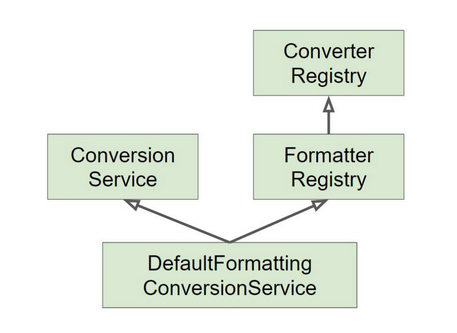
FormatterRegistry SPI FormatterRegistry 는 Formatter를 등록할 수 있도록 제공되는 인터페이스이면서 Converter를 등록할 수 있는 ConverterRegistry 인터페이스를 확장하고 있으므로 FormatterRegistry 하나로 Converter와 Formatter 등록이 가능하다. FormattingConversionService는 FormatterRegistry와 ConversionService 구현 및 확장하고 있는 클래스이다.
즉 FormattingConversionService 빈 등록을 통해 Formatter와 Converter에 대한 등록과 사용이 가능하다.
스프링 부트 웹 어플리케이션의 경우에는 DefualtFormattingConversionService을 상속하여 만든 WebConversionService를 빈으로 등록해주며, 이 때 Fomratter와 Converter빈을 찾아 자동으로 WebConversionService에 등록한다.
정리하면, 스프링에서는 타입변환을 위해 타입에 제한이 없는 Converter와 문자열, 국제화에 특화된 Formatter를 제공한다. 직접 호출보다는 자동으로 형변환이 수행될 떄 호출되며 DefualtFormattingConversionService을 통해 등록 및 접근할 수 있다. (하지만, Converter와 Formatter가 빈으로만 등록되어 있다면 자동등록 되므로 수동등록은 하지 않는다.)
3.6 Configuring a Global Date and Time Format
@DateTimeFormat을 사용하지 않고 전역적으로 날짜시간 타입의 변환을 위해 DefualtFormattingConversionService 설정할 수 있다.
@Configuration
public class AppConfig {

    @Bean
    public FormattingConversionService conversionService() {

        // Use the DefaultFormattingConversionService but do not register defaults
        DefaultFormattingConversionService conversionService = new DefaultFormattingConversionService(false);

        // Ensure @NumberFormat is still supported
        conversionService.addFormatterForFieldAnnotation(new NumberFormatAnnotationFormatterFactory());

        // Register date conversion with a specific global format
        DateFormatterRegistrar registrar = new DateFormatterRegistrar();
        registrar.setFormatter(new DateFormatter("yyyyMMdd"));
        registrar.registerFormatters(conversionService);

        return conversionService;
    }
}
public class PersonForm {

    @NotNull
    @Size(max=64)
    private String name;

    @Min(0)
    private int age;
}
LocalValidatorFactoryBean 스프링은 javax.validation.ValidatorFactory 와 javax.validation.Validator 를 구현한 LocalValidatorFactoryBean을 제공하므로써 기본 Validator를 빈으로 등록할 수 있게 한다.
import org.springframework.validation.Validator;

@Service
public class MyService {

    @Autowired
    private Validator validator;
}
2. DataBinder 가 바인딩 뿐만 아니라 검증도 할 수 있다.
Foo target = new Foo();
DataBinder binder = new DataBinder(target);
binder.setValidator(new FooValidator());

// bind to the target object
binder.bind(propertyValues);

// validate the target object
binder.validate();

// get BindingResult that includes any validation errors
BindingResult results = binder.getBindingResult();
binder.addValidators나 dataBinder.replaceValidators으로 validator를 추가하거나 변경이 가능하다.
3. Spring MVC 에서 @Controller 파라미터에 대한 선언적인 검증이 가능하다.
컨트롤러에서 @InitBinder 메서드에서 Validator를 추가하여 컨트롤러 인풋에 대한 검증이 가능하다.
ApplicationContext도 인터페이스이기 때문에 어떤 ApplicationContext 구현체에게 getResource()를 호출하느냐에 따라 리턴되는 Resource의 구현체가 달라진다. 예를 들어, ClassPathXmlApplicationContext에서 getResource()를 호출한다면 ClassPathResource가 리턴된다. 이러한 식으로 ApplicationContext와 리턴되는 Resource의 타입은 맵핑된다.
ResourceLoaderAware는 콜백 인터페이스로 컨텍스트에 생성된 ResourceLoader 빈을 가져올 수 있다.
public interface ResourceLoaderAware {
    void setResourceLoader(ResourceLoader resourceLoader);
}
물론 ApplicationContext가 ResourceLoader를 구현하고 있기 때문에 ApplicationContextAware로 컨텍스트를 이용하여 리소스에 접근할 수 있지만, 추천되지는 않는다. 해당 빈을 가져오고자 하는 이유가 리소스의 접근이라면 그 용도로 설계된 ResourceLoader 타입의 빈을 가져오는 것이 맞다.
만일 특정 빈이 고정된(static) 리소스를 필요로 한다면 프로퍼티로써 ResourceLoader를 사용하지 않고 Resource 빈을 주입할 수 있다. 예시처럼 value속성을 문자열로 주지만 Resource로 빈 주입이 가능한 것은 ApplicationContext가 등록하고 사용하는 특별한 JavaBean인 PropertyEditor가 있기 때문이다.
XML을 베이스로 한 ApplicationContext를 생성시 Resource를 활용하는 방법에 대해 알아본다.
ApplicationContext 생성시 Resource 인자
ApplicationContext을 소스코드로 생성자를 이용하여 생성할 때 인자로 문자열(String)을 지정한다. 문자열이 해석되어 특정 타입의 Resource객체로 XML파일이 로드된다. 문자열에 prefix를 지정하지 않으면 ApplicationContext의 구현체 타입에 따라 Resource의 타입이 결정되어 로드한다.
// ClassPathResource로 빈 설정파일이 로드된다.
ApplicationContext ctx = new ClassPathXmlApplicationContext("conf/appContext.xml");

// FileSystemResource로 빈 설정파일이 로드된다.
ApplicationContext ctx = new FileSystemXmlApplicationContext("conf/appContext.xml");
// classpath에서 해당 이름의 모든 xml이 로드된다.
ApplicationContext ctx = new ClassPathXmlApplicationContext("classpath*:conf/appContext.xml");
Ant-Style과 classpath*: prefix를 혼용하여 사용할 수도 있다.
FileSystemResource를 사용할 때 주의점 FileSystemApplicationContext는 모든 FileSystemResource 인스턴스들에 대해서 슬래쉬(/)의 유무에 상관없이 상대경로를 사용하도록 강제한다. 즉 아래 예시는 동일하게 상대경로를 지정한다.
// 1번
ApplicationContext ctx = new FileSystemXmlApplicationContext("conf/context.xml");

// 2번
ApplicationContext ctx = new FileSystemXmlApplicationContext("/conf/context.xml");
그러므로 만일 절대경로를 사용하고 싶으면 file:/// prefix를 활용하여 UrlResource를 사용하도록 한다.
// force this FileSystemXmlApplicationContext to load its definition via a UrlResource
ApplicationContext ctx = new FileSystemXmlApplicationContext("file:///conf/context.xml");

// actual context type doesn't matter, the Resource will always be UrlResource
ctx.getResource("file:///some/resource/path/myTemplate.txt");